1. Brushes & Setup
General Brushes
For these paintings I’ll be using the Wacom Intuos Draw graphics tablet so that I’m able to work with pen pressure sensitivity. Generally speaking, I always use the Hard Round Pressure Opacity Brush, which you can find in the Brush Presets for Adobe Photoshop.

This brush is not only great for the initial sketch, but also the base colors and overall painting. Make sure to utilize the Pressure for Opacity feature for even more stylus control.
Texture
Later on for the dreadlocks, I’ll need to incorporate texture into the painting. For this effect, I’ll be using the Chalk Brush in moderation.

Photo References
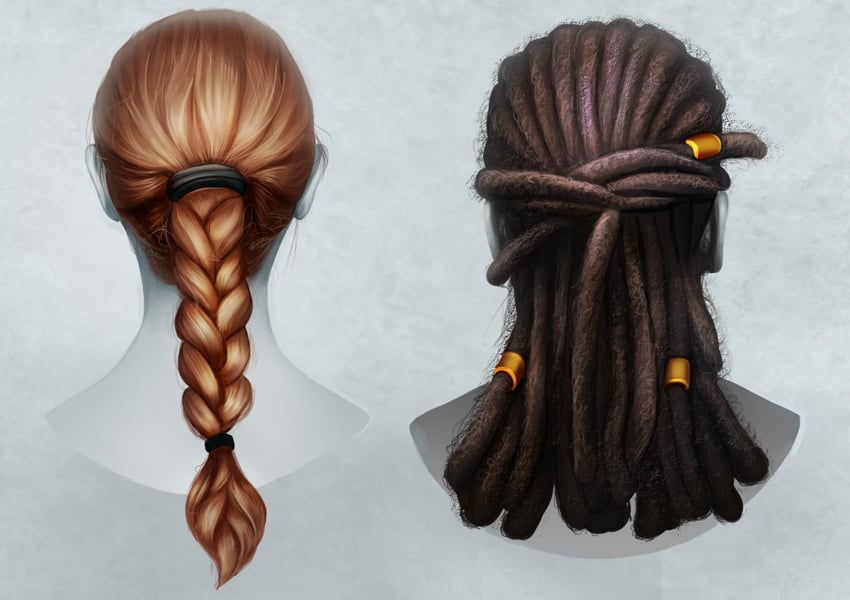
Here are the two main references I’ll be using from Envato Market. Try to get well-lit photographs so that you can clearly make out the hair’s directional path as well as its texture. You can also gather more inspiration online to keep you from copying one picture entirely.

Layer Setup
For every digital painting, I like to use what I call the “Blend Mode Method”. With this method, you set layers as Clipping Masks to the base colors of your painting and organize them by shadow and light. For the shadows, set the Layer Blend Mode to Multiply. And for the highlights set the layer to Overlay or Linear Dodge (Add). All other painting can be done on layers set to Normal.

Learn more about incorporating Layer Blend Modes into your digital paintings with my Easy Shading Tutorial.
2. How to Draw Braids
Braids aren’t as hard to draw as they might look. All you have to do is get to the root of the braiding pattern and you’ll develop the right rhythm and flow in no time!
Step 1
So before we get started painting, let’s break down the construction of a braid into an easy-to-follow format. Open a New Document at 1700 x 1200 pixels and 300 dpi. Using the Hard Round Pressure Opacity Brush with Pressure for Opacity selected, draw a quick oval and two lines for the back of the head and neck. Don’t forget to add the ears too!

Step 2
For this style, I’ll place the braid in a ponytail just like the braided reference (no longer available). Now draw a quick circle for the hair tie, and follow it up with three straight lines extending downward.

Step 3
Draw diagonal lines on both sides of the center line. Try to make sure the lines aren’t exact reflections. Do this by aiming the next alternating line below the previous one. Continue drawing these lines until you’ve hit the bottom of the braid.

Step 4
Now erase the straight lines and draw curves in their place instead. If you’d like to make the braid longer, feel free to do so. Add a hair tie at the bottom and some flowing hair to finish the sketch.

Before moving on to the painting, clean up this sketch first. Lower the Opacity to 50% for your current sketch layer and create a New Layer above it. Use this layer to clean up the lines using the same brush from before and add additional details like more strands of hair. Now Merge both layers together.
Below is the final sketch.

3. Paint Realistic Hair: Braids
Step 1
Hide the visibility of your sketch and place it in a New Group called “Painting”. Let’s first work on the background for this painting. Fill the background with a light blue-gray color (#dae3e6). Next, use the Chalk Brush to add texture to the background, adjusting the color with the Color Picker for a varying effect.

Step 2
Unhide the visibility of your sketch. Create two New Layers below it for the base colors. Separate the base layers for the hair and the rest of the neck. Use a Hard Round Brush (B) to paint a solid blue-gray color (#bbc3c6) for the neck. Then use a blue (#226f98) and light brown color (#b1927c) for the hair and hair tie.

Now add two more New Layers and set them as Clipping Masks to your bases. These will serve as the shadows for the neck and hair. Set the shadow layers to Multiply. To help blend the sketch into the base colors, set the sketch layer to Overlay.

Step 3
Adjust the Opacity of the sketch layer to 60%. Now select the shadow layers and begin painting the shadows for the neck and hair with the Hard Round Pressure Opacity Brush. Use the Eyedropper Tool (I) to set the Foreground Color to each base color. Because of the Layer Blend Mode applied, you will automatically create darker values of the base color you’ve picked up.

Let’s speed up the process a little. Experiment with Layer Blend Modes to see how they affect your shadows. Use a layer set to Linear Burn to create a Linear Gradient with a warm orange color, and then add more shadow on top of this effect with layers set to Multiply.

Step 4
Now let’s incorporate some highlights! Set a New Layer above your shadows to Linear Dodge (Add). Use the Eyedropper Tool (I) to select areas of color where you want the highlights. Then paint warm highlights all around the crown of the head and the individual braid links.

Continue adding more highlights. Decrease the size of your brush so that you can begin mimicking fine strands of hair.

Step 5
Now let’s clean things up. Merge all the layers that are currently clipped to your bases. Then Merge the two bases together. Take this opportunity to clean up the edges of your painting along the head and neck.

Step 6
Zoom into your painting and begin defining the details of the hair. Use a small Hard Round Brush (B) to show the directional path of the hair as it twists along the braid.

Don’t forget to add the little wispy strands! Make sure the Brush Hardness is set to 100%. These random pieces of hair can fly in any direction so experiment to see what works best.

Finish your braid painting by adding a little shadow behind your subject. You can also incorporate some environmental lighting from the background by painting gray onto the hair with a Soft Round Brush. Here is the final painting.

4. How to Draw Dreadlocks
Dreadlocks are even easier to draw than braids. Try to think of them as long hairy tubes that go down your back.
Step 1
Using the same document size from before, as well as the original textured background, begin drawing the back of the head and neck with the Hard Round Pressure Opacity Brush. At the top of the head, draw small bumps to show where the dreadlocks will start.

Step 2
Now gradually add your dreadlocks. Using your PhotoDune reference as a guide, draw each strand as a tube going down the back of the subject’s head. Try not to make the tubes too uniform because dreadlocks usually have a messy quality to them.

Continue working with the shape of your dreadlocks until they’re finished. Incorporate beads into the hairstyle for added character. Here is the final dreadlocks sketch on a simple white background.

5. Paint Realistic Hair: Dreadlocks
Step 1
Since we’re going to be using the same background from before, we can jump right into adding the base colors for dreadlocks painting. Create a New Group called “Dreadlocks” and place the sketch inside the group. Now create a New Layer underneath the sketch and use a Hard Round Brush (B) to fill the base with solid colors. Here I’ll be using:
- Purple for the hair:
#514f5b - Gold for the beads:
#b99556 - And gray for the skin:
#a1a1a1

Step 2
Now set the sketch layer to Overlay, adjusting the Opacity to 60%. Using the Blend Mode Method again, clip layers set to Multiply to the hair and body. Now begin painting shadow with a Soft Round Brush, concentrating the shadow on the left and right side of each tubular hair strand for an ambient light effect.

Step 3
Add another New Layer set to Multiply. Use the Eyedropper Tool (I) to set the Foreground Color to the purple that’s already on the canvas. Select the Gradient Tool (G). Set the gradient to Foreground Color to Transparent and create a quick Linear Gradient so that the deepest shadows are at the base of the hair. Adjust the Opacity to 73%.

Continue painting more shadow before quickly adding highlights to this painting. Set a New Layer to Linear Dodge (Add) and pick up the current hair color with the Eyedropper Tool (I). Use a Soft Round Brush to paint highlights towards the center of the head.

Step 4
Now for some texture! First Merge all the layers clipped to the bases together. Then Merge the two bases together as well.
Dreadlocks are made up of matted hair. This means that there will be lots of tiny hairs sticking out of each dreadlock. Use the Chalk Brush to paint texture all over the hair. Make sure to also paint texture along the edges of the head to represent tiny stray hairs.

Step 5
Since I’m not really feeling the current color of this hairstyle, I’ve decided to add a little warmth. Set a New Layer to Overlay and use a Soft Round Brush to color the hair with brown. This step might cause some of the details to blur together, so use a Hard Round Brush to paint more shadow between each dreadlock.

Time for highlights! Set a New Layer to Linear Dodge (Add) and begin painting highlights all over the hair. Use small squiggly strokes to represent the matted, tangled hair.
Concentrate these highlights toward the center of the tubes and the crown of the head. This will help to create great depth for this hairstyle.

Continue to define your painting. Finish painting the beaded details and add environmental light just like before by dusting the head with a soft gray color. Here is the final piece.
